Brand your course
Give the course your colours, and on Pro your logo and font, before you generate the content.
Before you start
Create a course first: see Create a course and describe it. Branding is step 2 of the build, right after Course, because the AI prompts read it while they generate content.
Steps
- Open the course and click the Branding step.
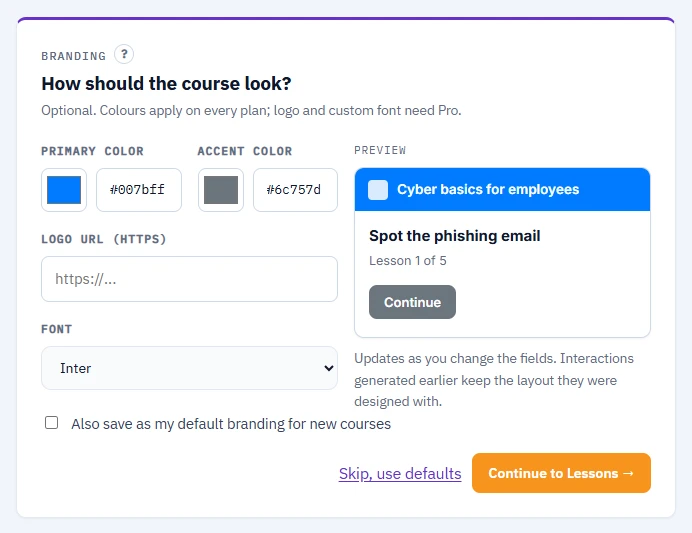
- Set the Primary color and the Accent color. Each has a colour picker and a hex field next to it, so you can paste a brand hex such as
#F7941D. - Optional: paste a Logo URL (HTTPS) - the address of a logo image already hosted somewhere public.
- Optional: pick a Font - Inter, IBM Plex Sans, Lato, Source Sans 3 or System font.
- Watch the Preview on the right: a bar in your primary colour with the logo and the course title, the first lesson below it, and a Continue button in your accent colour.
- Optional: tick Also save as my default branding for new courses, so the next course you create starts with these values.
- Click Continue to Lessons. A Presentation course says Continue to Slides instead, because Slides comes next there.
Note
There is no Save button here either. Colours and the logo save when you leave the field, the font saves the moment you pick it, and the panel shows Saved once it has.
What each plan covers
- Colours apply on every plan. The panel says so, and repeats "Your colours still apply on every plan." whenever a field is locked.
- Logo and custom font are part of the Pro plan. On Free those two fields are greyed out with a Pro badge and the note "Logo: available in Pro" or "Custom font: available in Pro", with a link to the plans. If you already had a value there, it stays saved and the note adds "Saved, and applied again as soon as the plan covers it." See Free and Pro: what is included.
Shortcuts
- Skip, use defaults jumps to the next step without touching the branding.
- Use my default branding appears at the top of the panel once your account has a default branding saved, and copies it into this course in one click.
What you should see
The preview matches your colours, and the exported SCORM package uses them in the course shell. If the course already contains interactions you generated earlier, the hint under the preview adds "Interactions generated earlier keep the layout they were designed with." - those files were written with the branding that applied when you generated them, so change the branding before you generate, or regenerate the interaction afterwards.
If something goes wrong
- The logo does not show: the address has to be reachable over HTTPS from anywhere, not a link that only works while you are signed in to your intranet or your cloud drive.
- The font looks different in the exported package: the course shell loads the web font when the learner's device can reach the font service. System font avoids the request altogether and is the safer pick for offline or locked-down LMS installations.
- The fields are greyed out: your plan does not cover logo and font yet. The values are kept, so nothing is lost.
Next
Build the outline: Import the table of contents from your AI.