Connect Perplexity with a custom MCP connector (web)
Connect Perplexity to your LMSable account with a custom MCP connector, so Perplexity can read your courses directly, instead of you pasting them in by hand.
Before you start
You need a Perplexity Pro account on the web (perplexity.ai). On the free Perplexity plan there is no option to add your own connector. In a company workspace an admin may have to allow custom connectors first.
Steps
- In Perplexity, open Plugins from the sidebar.
- Click Add custom and choose Add MCP connector.
- Name: LMSable. MCP server URL: the LMSable connector address shown on the connections screen (
https://lmsable.com/mcp). Leave the Advanced settings as they are: authentication OAuth, transport Streamable HTTP. - Tick the box that confirms you understand the risk of custom connectors and click Add. Perplexity opens the page of the new connector.
- Click Connect. LMSable opens in a new tab. If it asks you to sign in, enter the 6-digit code from your e-mail.
- On the LMSable screen Connect Perplexity to LMSable, choose an access level: Read only, or Read and edit. Every edit Perplexity makes saves a lesson version first, so you can always go back.
- Click Allow. You are back in Perplexity, which shows LMSable as Connected.
What you should see
Start a new search and ask "List my LMSable courses". Perplexity answers with the titles of your courses. The connector works in the normal search mode. Before every change to a lesson, Perplexity shows what it is going to save and waits for you to reply "yes".
On LMSable's AI chat connection screen, Perplexity appears under Connected apps.
Connecting with an access token instead
Use this if your company does not allow OAuth sign-in for connectors, or if the steps above end with an error.
- In LMSable, open the AI chat connection screen. Under New connection, enter a name, for example "Perplexity", choose Read and edit (or Read only) and click Create connection.
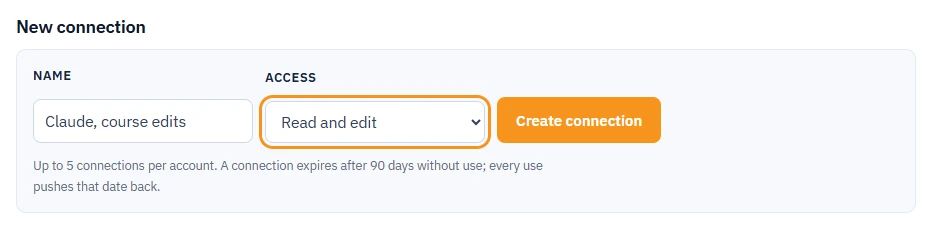
Choose Read and edit so Perplexity can change your courses. - Copy the token. LMSable shows it only once.
- In Perplexity, repeat steps 1 to 3 above, but open Advanced, set Authentication to API Key and paste the token into the field below it.
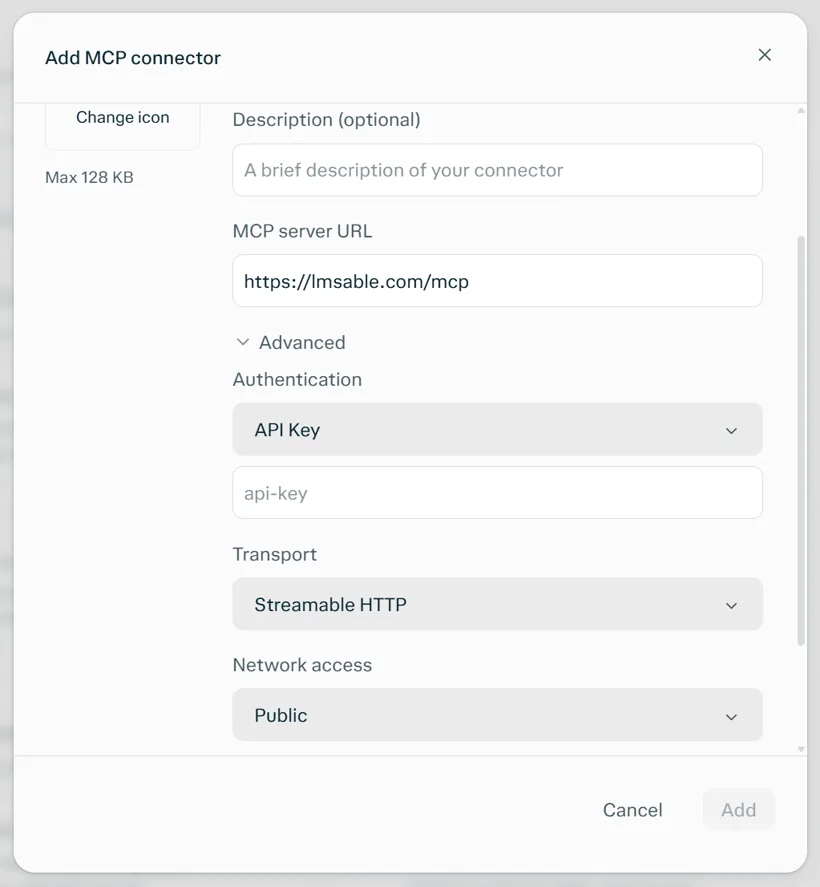
Under Advanced, choose API Key and paste your LMSable token into the field below. - Tick the risk box and click Add.
The token works like a password for your courses: do not share it. It expires after 90 days without use.
Disconnecting
Revoke the access on LMSable's AI chat connection screen: under Connected apps for a connection made with OAuth, or under Your connections for a token. You can also remove the connector in Perplexity: open it under Plugins, open the ... menu and choose Remove.
If something goes wrong
- No Add MCP connector option: your Perplexity account is not on Pro, or your workspace does not allow custom connectors. In a company workspace, ask your admin.
- An error after Add, for example invalid_redirect_uri: connect with an access token instead (see above), and tell us through Contact and bug reports.
- Editing tools are not offered: check you chose Read and edit on the consent screen or when creating the token. Otherwise revoke the access and connect again.
- 401 Unauthorized or Perplexity stops seeing your courses: the connection may have been revoked or expired - connect again.
- "This course is archived because your account exceeds the Free plan limit.": editing from the chat works on every LMSable plan, but on Free only your active course can be edited. Make this course your active course or upgrade to Pro. See Free and Pro: what is included.
Next
See what Perplexity can do once connected: What your AI can do with your course. Using ChatGPT or Claude instead: Connect ChatGPT with a custom MCP server, Connect Claude with a connector.